 |
We are going to build a small box with electronics with a PCB inside. The
PCB and lids will be connected to the box by continuous soldering along the whole
length of the edge. |
|
|
|
|
Some of the pictures contain notes because they don't show what they
should exactly show. When you build your one, please make these missing
pictures and send to the author so he can fix the guide. |
|
|
|
|
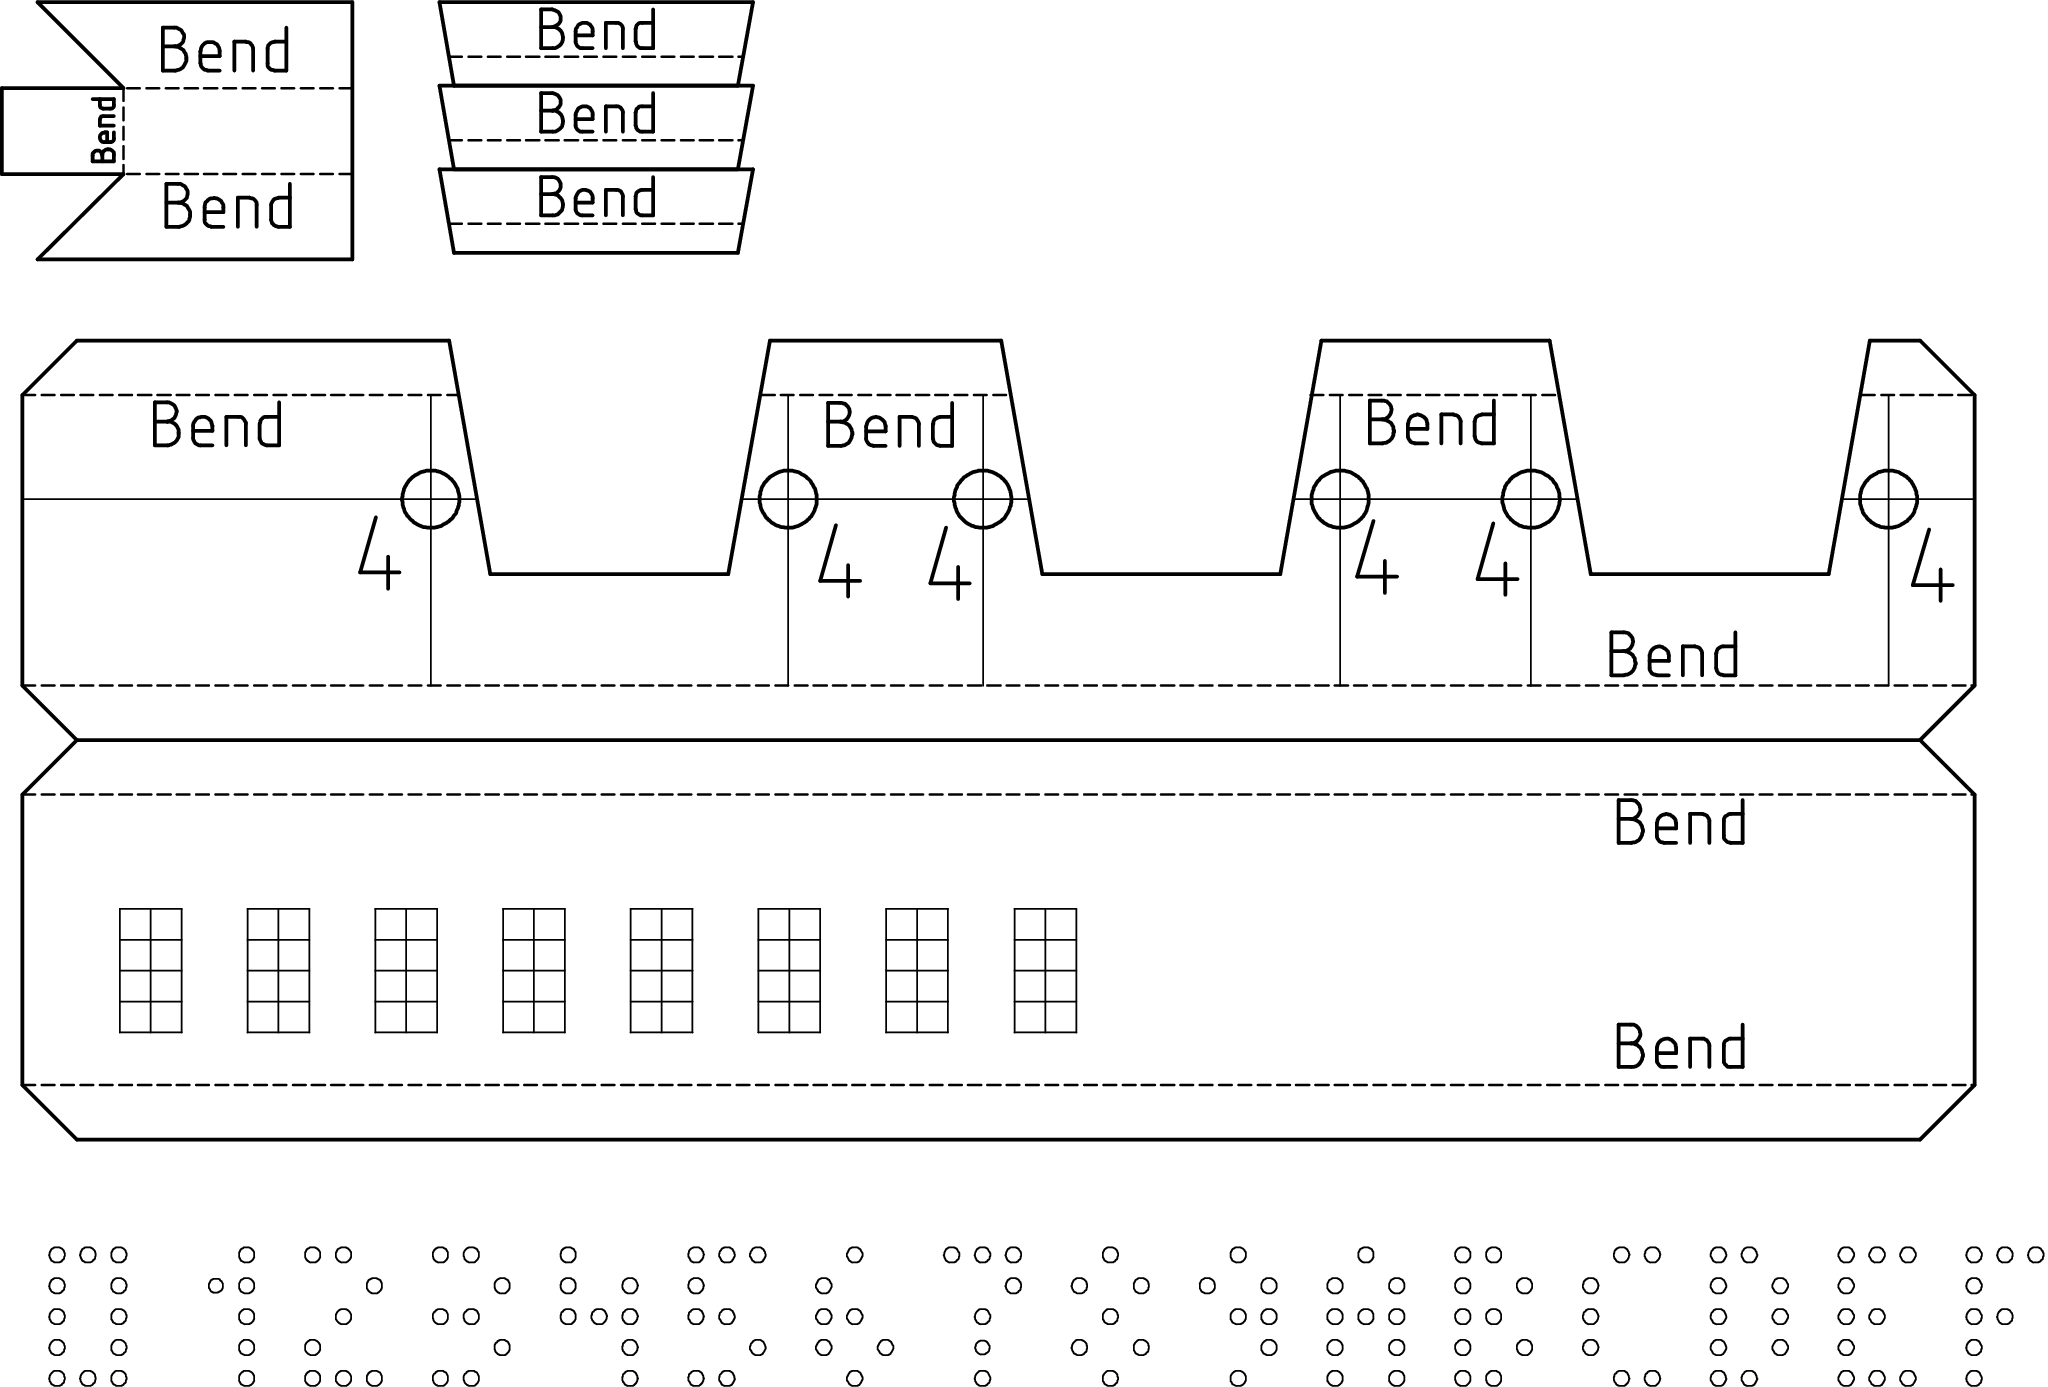
Cutting the board
Cut the board on the side with wide silver strip so that the connectors
are flush with the edge:
- Insert the two side connectors
- Make a mark with a thin marker or pencil
- Remove both connectors
- Connect with a ruler
- Cut with tin cutters
- Cut the two corners so that all 4 corners are alike
- Put on a flat file and grind down for a sharp edge
- Measure the width of the board after cutting in millimeters.
Pick up the appropriate template set
and print it.
Note: the picture should be without the cable and components.![Gallery[1e65]](http://images.twibright.com/tns/lvl1/1e65.jpg) |
|
|
|
|
Connector-independent template
Print this template. |
|
|
![Gallery[1e62]](http://images.twibright.com/tns/lvl2/1e62.jpg)
|
Template cutting
Shear out the templates from paper with 1-2mm extra space around. Glue them
down on a tin and cut them out with tin shears. Do not cut out cutouts in
drilled pieces yet. ![Gallery[1e61]](http://images.twibright.com/tns/lvl1/1e61.jpg) |
|
|
![Gallery[1e64]](http://images.twibright.com/tns/lvl2/1e64.jpg)
|
Drilling
Drill out all templates and then cut out remaining cutouts. ![Gallery[1e63]](http://images.twibright.com/tns/lvl1/1e63.jpg) |
|
|
|
|
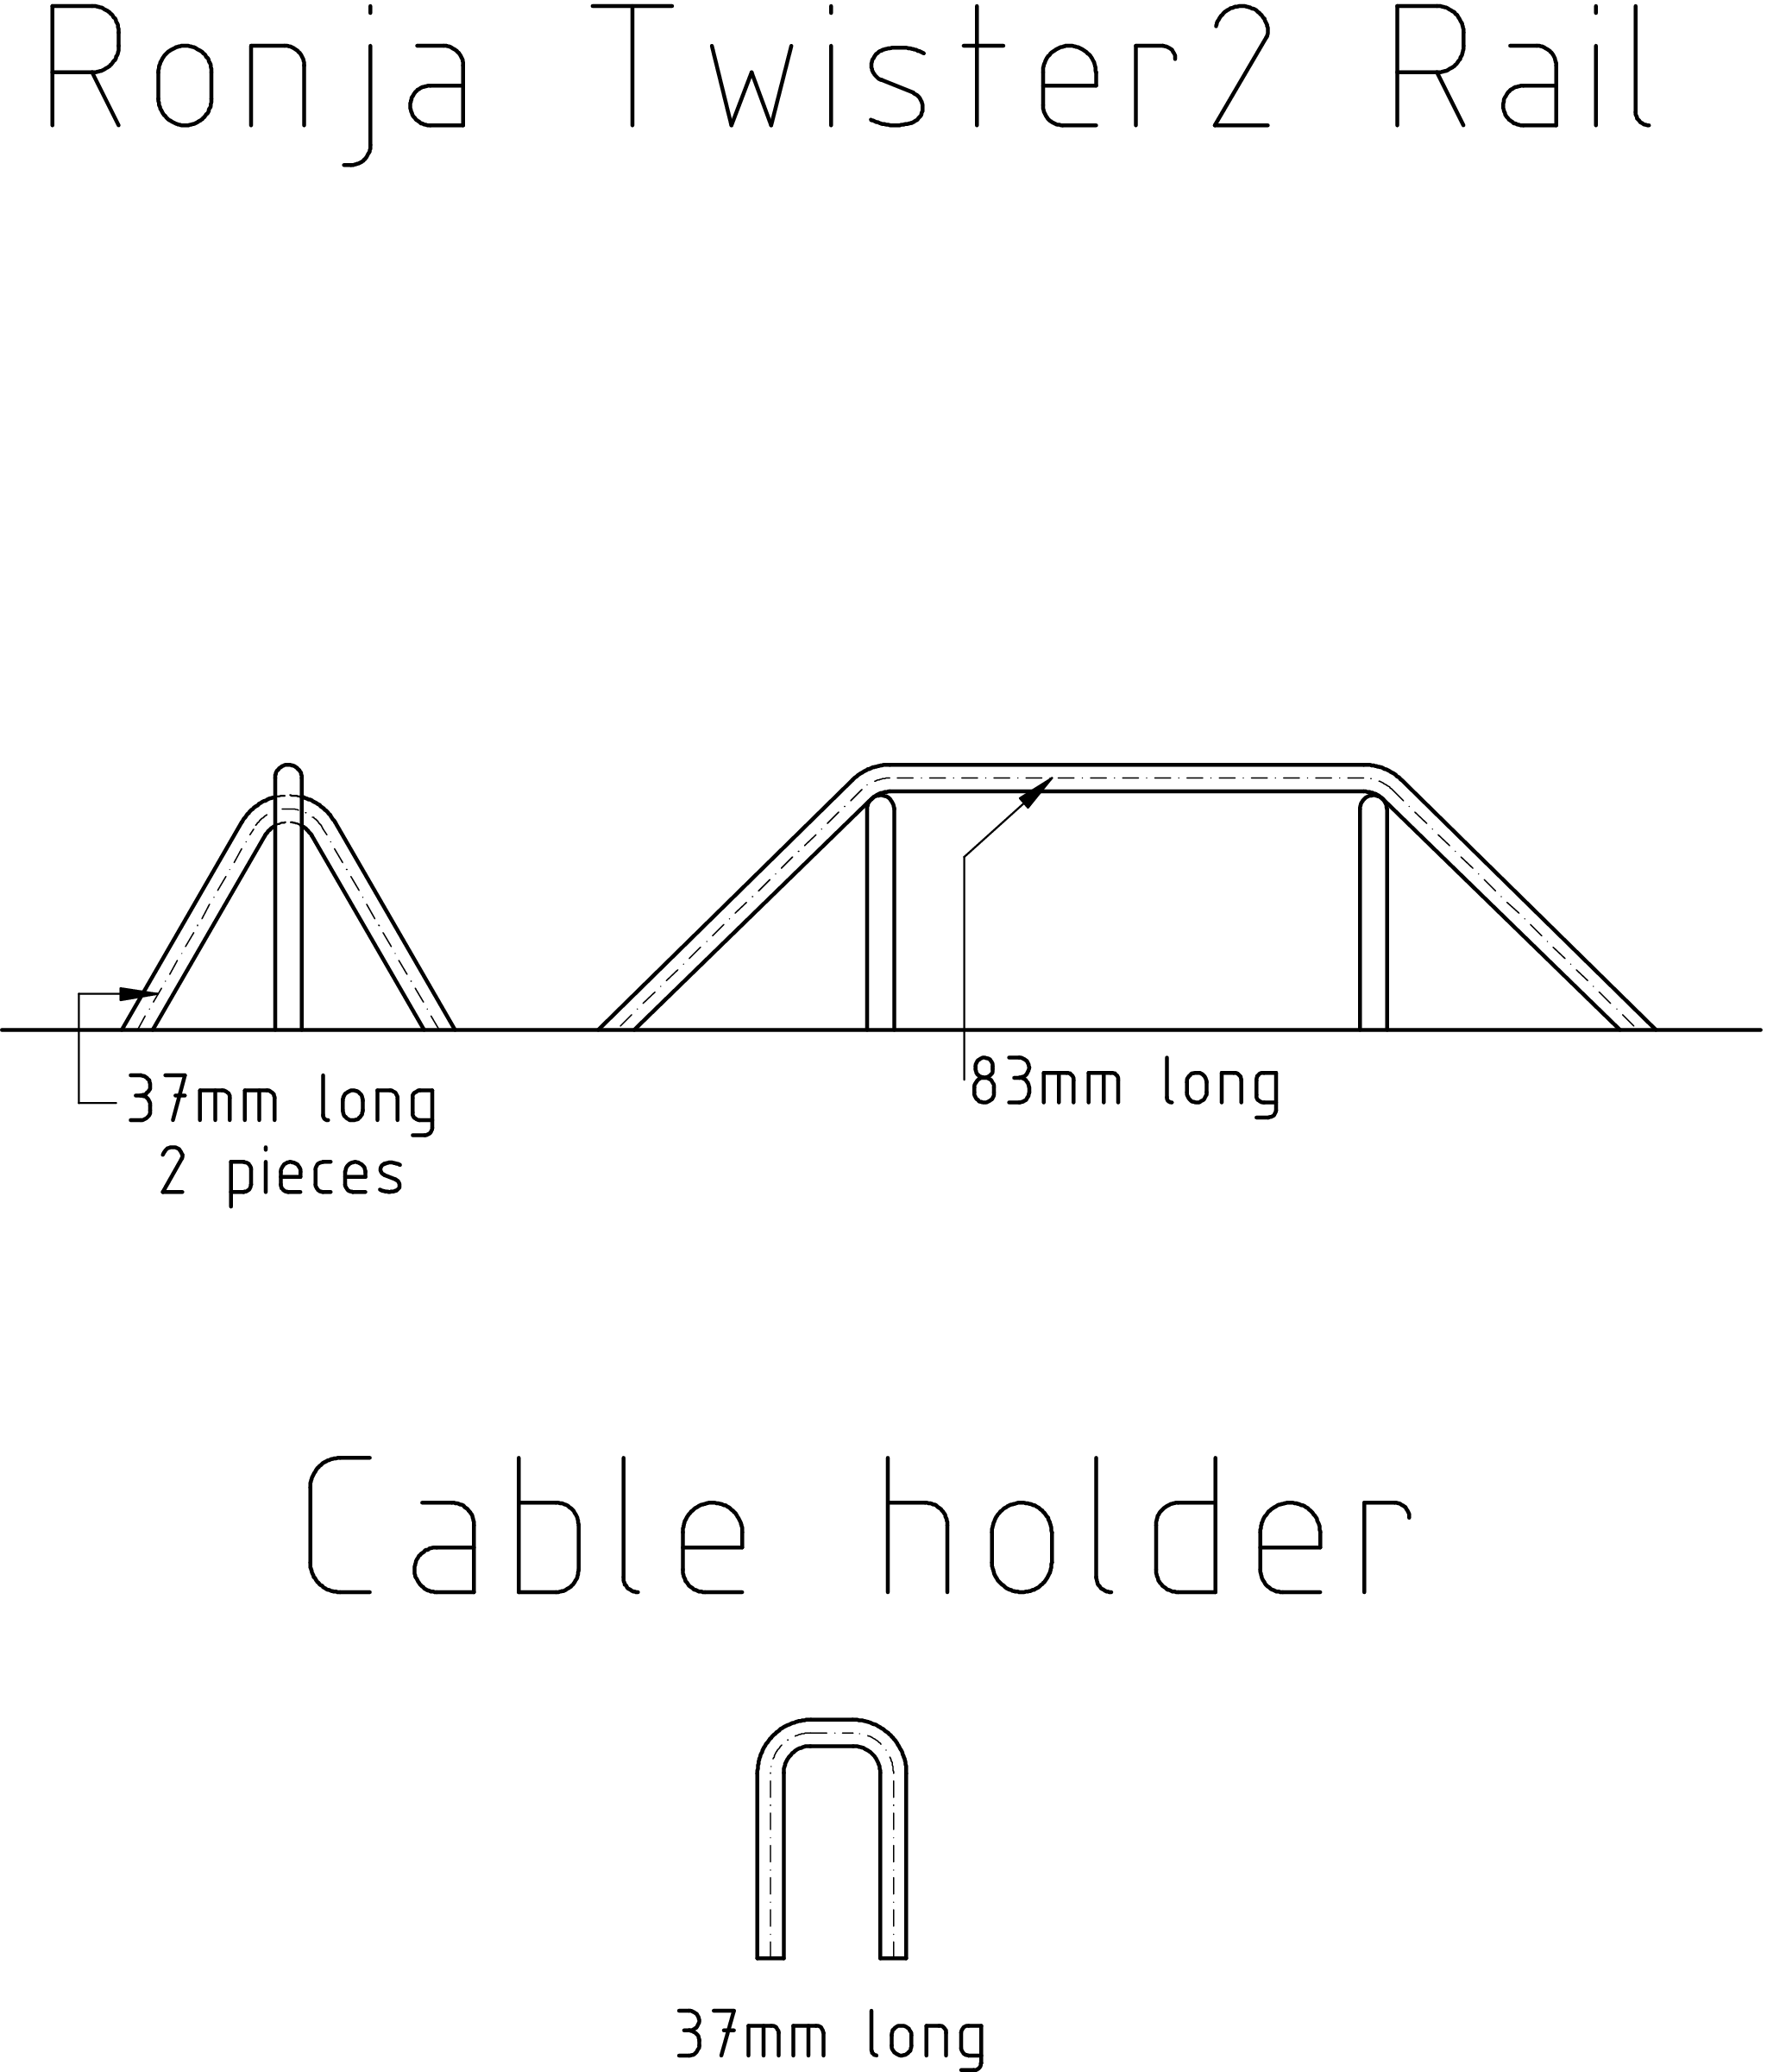
Rail
Print this template. Cut and bend 2.5mm^2 wire according to it. |
|
|
|
|
Finishing the lids
- Optional: punch the logo with a centrepunch and a hammer
- Bend the borders of the both lids 180 degrees so the paper stays out
- The fronts in the drawing wil be bent in the following step.
Note: the picture should be still with paper. ![Gallery[1e72]](http://images.twibright.com/tns/lvl1/1e72.jpg) |
|
|
|
|
Finishing the fronts
- Optional: punch out a serial number
- Bend all bends by 90 degrees away from the paper, except the shortest
one which is bent only 45 degrees.
Note: all the fronts pictures should be still with paper. |
|
|
![Gallery[1e6c]](http://images.twibright.com/tns/lvl2/1e6c.jpg)
|
Water
Throw all templates into water and remove the paper this way. Clean the
templates completely. |
|
|
|
|
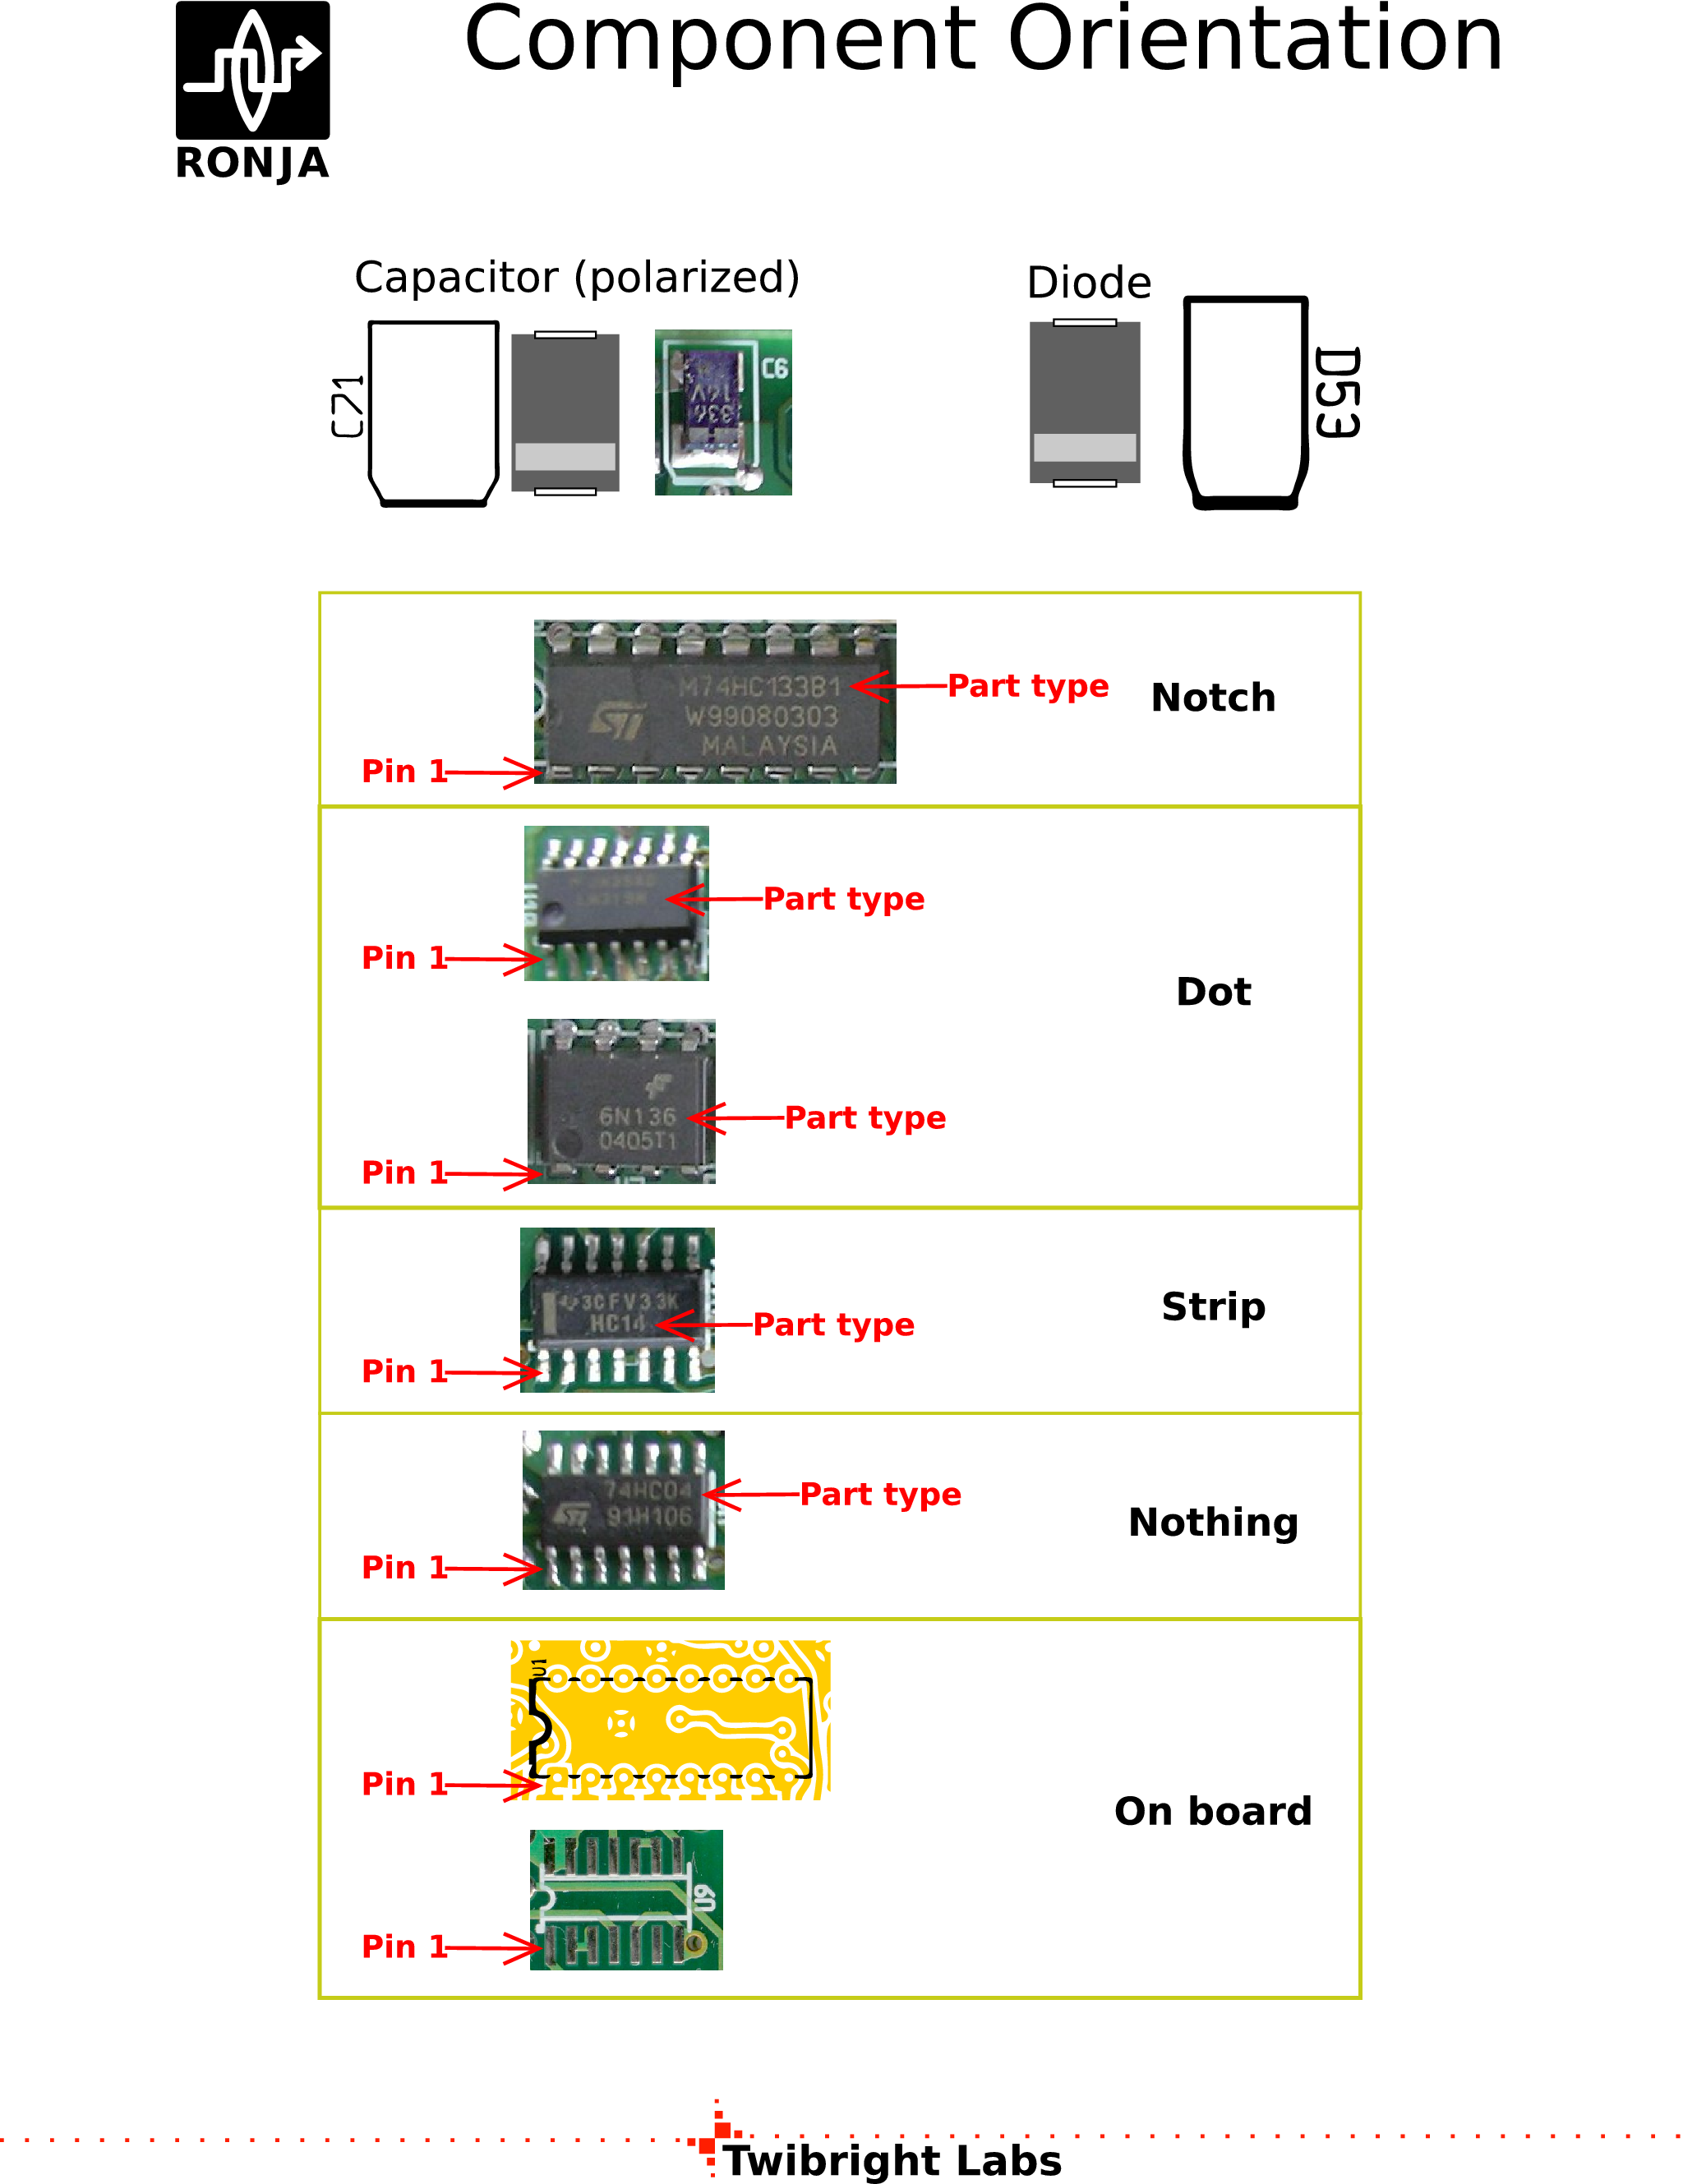
PopulationPrint the appropriate
partlist and populate the board, keeping in mind the components polarity
and putting the label on the component always up.
Note: the pictures should be without the faceplate and the screws. |
|
|
Cleaning
Put the board into isopropylalcohol and clean out with an old toothbrush all
the rosin flux. Don't pour the dirty isopropyl into the switches if you don't
have to. If you have to, wash it out once in clean and blow out from the
switches before it dries out. Finally, let the whole board dry. |
|
Checking
The most common problem is a SMD pin that looks like soldered with small
amount of solder, but is actually not soldered at all and can be detached with
a needle.
- Check all pins for bad or missing soldering. Sometimes a SMD pin
looks like soldered, but is only touching the pad. Play a dentist - try
to lift every suspicious SMD pin with the needle. Resolder in case of
doubt. Every unusually bulged, wrinkled or cracked tin drop has to be re-melted
with a dab of rosin flux.
- Check all IC's, polarized capacitors, diodes and LEDs that they are not
turned around
- Print out the population list once more and check all components for the
right value and type (where you can see it).
|
|
 |
WarningWhat do you think would happen if you skip this correctness
check? "Your board would come to a screeching halt and you'd fly.
And you'd smash cement." -- Stacy Peralta, Dogtown and Z-Boys" |
|
|
![Gallery[1e6e]](http://images.twibright.com/tns/lvl2/1e6e.jpg)
|
Soldering the sides
Note: the pictures should still have gaps in the corners instead of a wire.
- Screw on the side on connectors and solder down from both sides.
- Solder down the 3 little pieces that fit into the connector cutouts.
Solder them directly on the connector bodies. If there's a danger of melting
the plastic, continue on a different connector and return back to the first
one later.
- Solder down the adjacent sides. Maintain the corner gap on both sides the same.
- Solder down the remaining side (the long blank one).
- Solder together the cable sleeve (seen in the bottom of the picture) and solder
it over the hole in the indicated position.
|
|
|
![Gallery[1e77]](http://images.twibright.com/tns/lvl2/1e77.jpg)
|
Soldering the corners
Solder a piece of 1.5mm^2 wire on each corner. Then bend the ends by 90 degrees
and cut immediately behind the bend. Solder down the bent part too.
Solder the cable holder wire loop touching the corner wire.
Note: the big picture should be without the cable and the lid. |
|
|
|
|
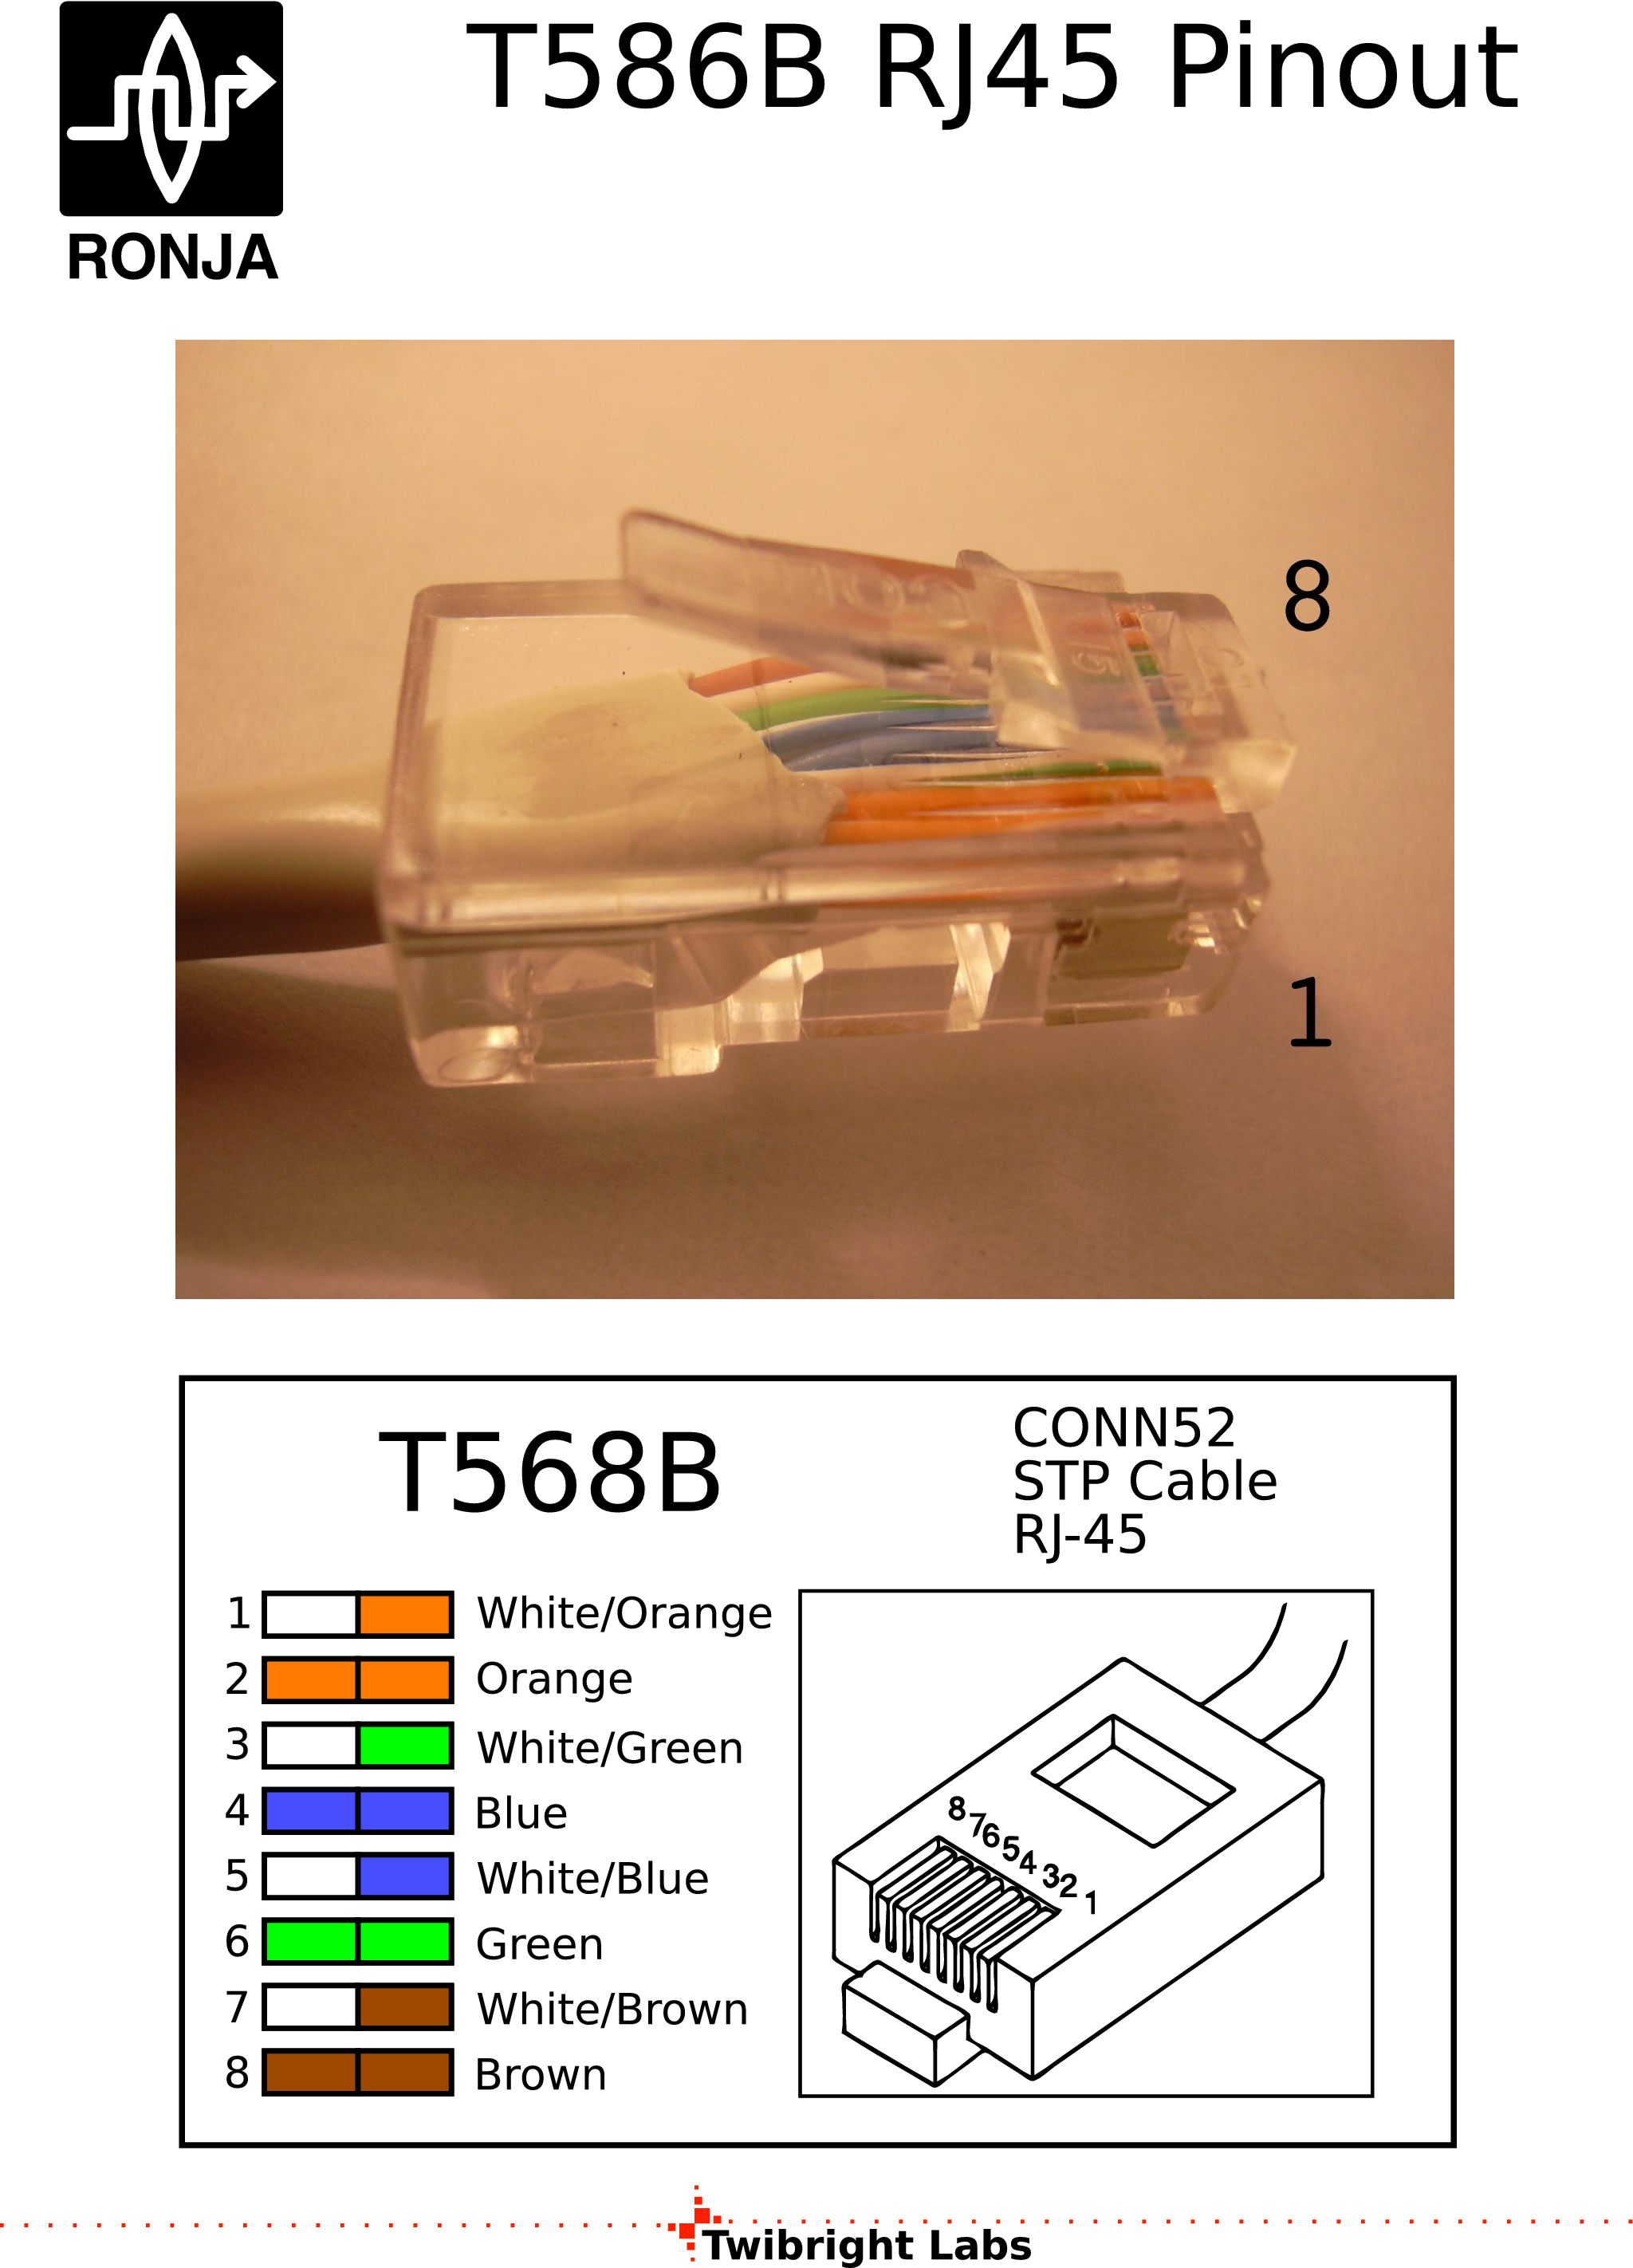
STP cable
- If you don't have ready-made cord,
Cut 2m of STP cable or 1m of UTP cable and crimp a RJ-45 modular jack best with jacket at the end
(recommended wiring: T568B).
- Strip 40mm of outer insulation from the end without the
jack. Trim the shield wire down to 20mm.
Strip 5mm from each individual wire.
- Cover the stripped wires, including the shield, with solder on the end.
- Stick the cable into the square tube, draw the shield back inside the case and solder it down
to the tin.
- Solder the cable to the 5 solder pads:
| RJ45 contact | Solder pad |
|---|
| 1 | T53 |
| 2 | T54 |
| 3 | T51 |
| 6 | T52 |
- Solder the 4 remaining wires to T55 or the bare metal.
Note: the cable in the picture should be stranded and the connectors
shielded.
|
|
|
|
|
Gluing down the cable
Press hot glue or silicon sealant between the cable and the metal sleeve.
Note: the picture should be without the lid. |
|
|

 Contact, support: Clock
on the Internet Relay Chat.© 1998-2016 Karel ‘Clock’ Kulhavý et al..
Contact, support: Clock
on the Internet Relay Chat.© 1998-2016 Karel ‘Clock’ Kulhavý et al.. ![Gallery[1e69]](http://images.twibright.com/tns/lvl1/1e69.jpg)
![Gallery[1e70]](http://images.twibright.com/tns/lvl1/1e70.jpg)

![Gallery[1e6b]](http://images.twibright.com/tns/lvl1/1e6b.jpg)
![Gallery[1e67]](http://images.twibright.com/tns/lvl1/1e67.jpg)
![Gallery[1e68]](http://images.twibright.com/tns/lvl1/1e68.jpg)
![Gallery[1e71]](http://images.twibright.com/tns/lvl1/1e71.jpg)
![Gallery[1e6a]](http://images.twibright.com/tns/lvl1/1e6a.jpg)
![Gallery[1e6d]](http://images.twibright.com/tns/lvl1/1e6d.jpg)
![Gallery[1e6f]](http://images.twibright.com/tns/lvl1/1e6f.jpg)

![Gallery[ed7]](http://images.twibright.com/tns/lvl0/ed7.jpg)
![Gallery[ef2]](http://images.twibright.com/tns/lvl0/ef2.jpg)