 |
Overview
We are going to build two identical small consoles that can be seen in
the following three pictures of a complete installation of Ronja containing
Perpendicular console:
- The console consists of two identical assemblies.
- Each assembly consists of 2 L sections and one short U section.
- The consoles are the parts in the picture that hold the device
on the wall.
|
|
|
|
|
L profiles
Drill the holes in four L profiles according to the drawing. |
|
|
|
|
U profiles
Drill the holes in two U-profiles according to the drawing. |
|
|

|
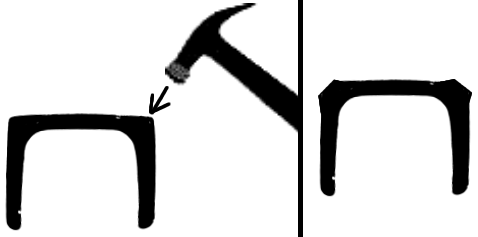
Shaping
corners Bang the U section along the edges with a big hammer to bulge
the edges and thus cancel out any convexity on the middle face of the U
section. |
|
|
Painting
Paint the steel sections: two layers of primer and two layers of top coat. |
|
Grinding paint
Remove the paint around the 10.5mm holes with emery paper. |
|
|
|
Assembly
Put the parts together into two identical groups, one group is indicated in
the 3D model. |
|
|
|
|
Screws
Insert 2 M8x35 bolts and put on 2 M8 nuts for each group,
according to the cut out 3D model of single group. |
|
|
|
|
Completion Tighten slightly the
screws. You are going to have two identical objects, one of them is shown in
the 3D model. Mount two M10x40 bolts into the holes, put one M10 spring washer
on each bolt and on M10 nut on each bolt. Do not tighten the M10 nuts. The M10
bolts will serve for interfacing the universal holder.
You can see from the following pictures of complete Ronja installation
with Perpendicular consoles how the consoles itself are assembled together: |
|
|

