Twibright Quickbread, an opensource bread
Provides
Following properties of the bread:
- Not an empty foam
- You run out of bread, you don't have to go shopping
- Quick to make. Directly bake after mixing.
- Pre-sliced. Adjustable slice size.
- Health benefit: reduced AGEs, low salt
- /!\ Warning: if you like to make the crust hard, don't accidentally hit your front teeth with the bread edge on. I am afraid it might knock
your teeth out. /!\
Tools required
- An oven with temperature setting,
or a piece of ordinary paper instead of thermometer
- A bowl or pot, big
- For better consistency of result: skewer
- Baking tin
Material required
- Wheat flour, the cheapest on the shelf. Max. 1 kg, typ. 0.5 kg.
- From grocery store: leavening powder, not yeast.
Emergency replacement: baking soda (the bread will be different in your mouth).
- Water, tap, max. 0.3 L
- Butter or margarine, coconut oil, vegetable oil, tiny amount
Time required
- 7 min. work time
- 30 min. wait time
Manufacture
- Take the baking tin outside the oven
- Turn on the oven at 150 degC. The setting is important. For small piece of ordinary
paper instead of thermometer: 140 degC is where it starts turning brown.
- Wash the baking tin clean
- Put the flour into the pot
- According to instructions on the leavening powder, add it. For baking soda: sprinkle the
surface.
- Thoroughly mix, the baking powder should arrive everywhere.
Using your fingers like a rake.
- Using your fingers like a rake and not touching the dough with your palms, add water slowly while mixing while staying always on
the dry side. Do not knead or press, mix only. Proceed until all flour is absorbed into the dough.
- Take the mass out of the pot
- Using the baking tin as a pad, 10 times flatten to about 5 cm (2 in) and fold.
- Using the baking tin as a pad, flatten out to thickness of 0.8 in (2 cm)
- Press for even thickness.
- Lift each half and cover the baking tin underneath with a thin layer of butter or other of those greasy stuffs. If you do
this earlier, the bread may be stuck to the tin after baking.
- Put in the middle of the oven.
- You may wish to check for the right stiffness inside during baking by poking with a skewer or finger.
- Bake for 40 min. Next time you may wish to adjust the temperature or time according to your taste (see below).
- The result should be white or light golden. Turn off the oven and take the tin out.
Adjust baking time and temperature to your taste
- Increase temperature: more difference between outside and inside hardness and brownness
- Increase time: more overall hardness and dryness and brownness
/!\ Warning /!\
- /!\ Warning: if you like to make the crust hard, don't accidentally hit your front teeth with the bread edge on. I am afraid it might knock
your teeth out./!\
Usage
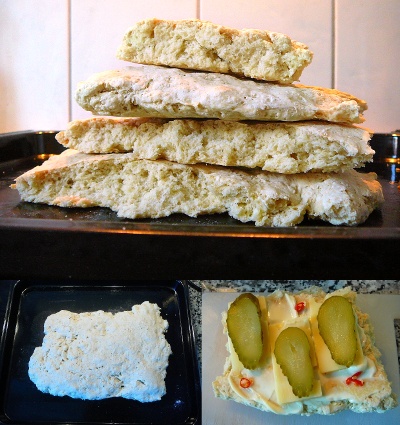
- Storage: break into suitably big chunks and store in a paper bag or open plastic bag.
- Eating: break the sheets into suitable size pieces. Use the flat bottom part to
apply spreads, butter, honey, mayonnaise, cheese slices and other dressings
- Quick snack: spread mayonnaise, add 1-3 tiny pieces of Thai chilli according to your tolerance to
hot foods, add sliced cheese, sliced pickled gherkins,
cut up a tomato into 6-8 segments and salt the cut surfaces, eat together. Various parts can be left out.
Troubleshooting
- Squishy, watery, bland, water seeps on the surface, or makes stomach feel like balooning up:
increase baking time
- Hard, eating it feels like eating bathroom tiles: decrease baking time
- Outside is brown and scorched and inside is still too squishy: decrease baking temperature
- Tastes like washing powder: make sure the flour is not stored in an area where cleaning product
smells enter the air
Consumer Support
Technical data
- Thickness: 1.5 inch nominal
- Color: White to light golden
- Consistency: Soft, dense
- Taste: neutral
- Allergy: not suitable for celiacs
- Estimated life until sensory degradation: 4 days
- Estimated life until molding: 6 days
Want to say thank you?
If you want to thank to Twibright Labs for this product, please donate to Twibright Distillcooker.

 Contact, support: Clock
on the Internet Relay Chat.© 1998-2016 Karel ‘Clock’ Kulhavý et al..
Contact, support: Clock
on the Internet Relay Chat.© 1998-2016 Karel ‘Clock’ Kulhavý et al..